Upgrade GRID infrastructure is one activity that usually is postponed because it involves a sensible area that, when not works, causes big downtime until be fixed. But, in the last versions, it is not a complicated task and if you follow the basic rules, it works without problems.
Here I will show a little example of how to upgrade the GI from 18.6.0 to 19.5. The steps below were executed at Exadata running version 19.2.7.0.0.191012 and GI 18.6.0.0, but can be done in every environment that supports Oracle GI.
Requirements and Plan
The basis for every upgrade is, first, check the requirements to do that. This means not just for operational system version, but the current GI version (that one that will be upgraded). For Exadata and GI 19 you can follow the note 19c Grid Infrastructure and Database Upgrade steps for Exadata Database Machine running on Oracle Linux (Doc ID 2542082.1) but can use as a guide even in the non-Exadata environment.
Every upgrade or patch needs to be planned to be successful. Check previously the current versions, backup, and others are the basis. There is no rule of thumb, but a base plan has:
- Check operation system requirements (like version).
- Check current GI requirements (maybe install additional patches, like 28553832 for Exadata).
- Check system requirements (space and others).
- Check Oracle Home Requirements (maybe you need to apply additional patches for Oracle Homes).
- Download and copy to one server that will be patched (this includes the patches to be applied over the new GI).
- Prepare the X (you can use xauth and redirection through ssh).
You can follow the note hinted previously to see all the requirements. Another REQUIRED reference is the blog of Mike Dietrich that is dedicated to Oracle Upgrade Practices. Since I am doing this at Oracle Exadata, I downloaded the compatible versions from note Exadata Database Machine and Exadata Storage Server Supported Versions (Doc ID 888828.1).
Pre-Upgrade
When you start the upgrade phase you already have all the requirements OK (operational system, previous GI patched). The steps here are based in the note 19c Grid Infrastructure and Database Upgrade steps for Exadata Database Machine running on Oracle Linux (Doc ID 2542082.1) but I will include some extra details and tricks that will help you.
Memory parameters
It is necessary to have at least 3GB for SGA to correctly upgrade (and runs) the GI 19c version. Check this in the current GI to guarantee that this is OK (executed as grid user):
[grid@exacl04n1 +ASM1]$ sqlplus / as sysdba

SQL*Plus: Release 18.0.0.0.0 - Production on Fri Jan 24 14:57:24 2020
Version 18.6.0.0.0

Copyright (c) 1982, 2018, Oracle.  All rights reserved.


Connected to:
Oracle Database 18c Enterprise Edition Release 18.0.0.0.0 - Production
Version 18.6.0.0.0

SQL> show parameter memory_target

NAME                                 TYPE        VALUE
------------------------------------ ----------- ------------------------------
memory_target                        big integer 0
SQL> show parameter memory_max_target

NAME                                 TYPE        VALUE
------------------------------------ ----------- ------------------------------
memory_max_target                    big integer 0
SQL> show parameter use_large_pages

NAME                                 TYPE        VALUE
------------------------------------ ----------- ------------------------------
use_large_pages                      string      TRUE
SQL> show parameter sga_max_size

NAME                                 TYPE        VALUE
------------------------------------ ----------- ------------------------------
sga_max_size                         big integer 3G
SQL> show parameter sga_target

NAME                                 TYPE        VALUE
------------------------------------ ----------- ------------------------------
sga_target                           big integer 3G
SQL> exit
Disconnected from Oracle Database 18c Enterprise Edition Release 18.0.0.0.0 - Production
Version 18.6.0.0.0
[grid@exacl04n1 +ASM1]$
Folders
Create all the folders for oracle GI installation. This means (usually) the /u01/app/19.0.0.0/grid for GI at Exadata.
[root@exacl04n1 ~]# dcli -g /zfs/EXADATA/exacl04.txt -l root mkdir -p /u01/app/19.0.0.0/grid
[root@exacl04n1 ~]# dcli -g /zfs/EXADATA/exacl04.txt -l root chown grid /u01/app/19.0.0.0/grid
[root@exacl04n1 ~]# dcli -g /zfs/EXADATA/exacl04.txt -l root chgrp -R oinstall /u01/app/19.0.0.0/grid
[root@exacl04n1 ~]#
In Exadata, I used dcli to do that automatically in every node of the cluster. But remember to check the ownership of the folder in every node.
After you create the folders, in the first node (where +ASM1 runs), you can unzip the GI Base version for 19c (downloaded from edelivery.oracle.com) in the folder for GI destination. Remember to execute this as the user that will run GI, in this case, I made with grid user and unzipped directly from an NFS folder (but you can put in a local folder and unzip):
[grid@exacl04n1 +ASM1]$ unzip -q /nfs/19c/Exadata-Patch/19c-Grid/V982068-01.zip -d /u01/app/19.0.0.0/grid
[grid@exacl04n1 +ASM1]$
runcluvfy
Cluster verify utility is amazing because automates a lot of tests and checks. It is needed to execute before you continue because it will report to you the success (if everything is OK), or error and points to be fixed.
In this case, I made (the output was cropped but a full output can be checked here at runcluvfy-GI-Upgrade):
[grid@exacl04n1 +ASM1]$ cd /u01/app/19.0.0.0/grid/
[grid@exacl04n1 +ASM1]$
[grid@exacl04n1 +ASM1]$ ./runcluvfy.sh stage -pre crsinst -upgrade -rolling -src_crshome /u01/app/18.0.0/grid -dest_crshome /u01/app/19.0.0.0/grid -dest_version 19.0.0.0.0 -fixup -verbose

Verifying Physical Memory ...
  Node Name     Available                 Required                  Status
  ------------  ------------------------  ------------------------  ----------
  exacl04n2     84.1372GB (8.8224204E7KB)  8GB (8388608.0KB)         passed
  exacl04n1     84.1372GB (8.8224204E7KB)  8GB (8388608.0KB)         passed
…
Verifying ASM Filter Driver configuration ...PASSED
Verifying Systemd login manager IPC parameter ...PASSED

Pre-check for cluster services setup was successful.
Verifying RPM Package Manager database ...INFORMATION
PRVG-11250 : The check "RPM Package Manager database" was not performed because
it needs 'root' user privileges.


CVU operation performed:      stage -pre crsinst
Date:                         Jan 24, 2020 3:17:24 PM
CVU home:                     /u01/app/19.0.0.0/grid/
User:                         grid
[grid@exacl04n1 +ASM1]$
As you can see, it was a success. But one example of a failed report is:
Checks did not pass for the following nodes:
        zeroing02,zeroing01


Failures were encountered during execution of CVU verification request "stage -pre crsinst".

Verifying Node Connectivity ...FAILED
zeroing02: PRVG-11068 : Highly Available IP (HAIP) is enabled on the nodes
            "zeroing01,zeroing02".

zeroing01: PRVG-11068 : Highly Available IP (HAIP) is enabled on the nodes
            "zeroing01,zeroing02".

Verifying RPM Package Manager database ...INFORMATION
PRVG-11250 : The check "RPM Package Manager database" was not performed because
it needs 'root' user privileges.


CVU operation performed:      stage -pre crsinst
Date:                         Dec 9, 2019 1:38:46 PM
CVU home:                     /u01/app/19.0.0.0/grid/
User:                         oracle
[root@zeroing01 ~]#
Prepare Patch for the New GI
It is possible to patch the new GI even before install the 19c GI (the same was possible to do at 12 and 18c too). It is recommended by the way. Fortunately, you don’t need to patch manually, you just call the gridSetup.sh with -applyRU if it is Release Update (or -applyRUR for RUR patch).
Since some files will be overwritten, I create in node 1 one new folder to backup them (executed as the same owner from GI):
[grid@exacl04n1 +ASM1]$ mkdir /u01/patches/grid-19c
[grid@exacl04n1 +ASM1]$
To apply these patches correctly it is needed to update the opatch from the GI base release (that was unzipped previously). Execute this as the same user that will run GI:
[grid@exacl04n1 +ASM1]$ #backup current opatch to the folder created before
[grid@exacl04n1 +ASM1]$
[grid@exacl04n1 +ASM1]$ cp /u01/app/19.0.0.0/grid/OPatch /u01/patches/grid-19c/OPatch-ORG -R
[grid@exacl04n1 +ASM1]$
[grid@exacl04n1 +ASM1]$ # go to GI home folder
[grid@exacl04n1 +ASM1]$ cd /u01/app/19.0.0.0/grid
[grid@exacl04n1 +ASM1]$
[grid@exacl04n1 +ASM1]$ # unzip the new version of Opatch for 19c
[grid@exacl04n1 +ASM1]$ unzip -qa /zfs/EXADATA_PATCHING/19c/Exadata-Patch/p6880880_190000_Linux-x86-64.zip
replace OPatch/emdpatch.pl? [y]es, [n]o, [A]ll, [N]one, [r]ename: A
[grid@exacl04n1 +ASM1]$
As you saw, I create the backup of Opatch and overwritten with the new version. Remember to execute this with the same user that will runs GI.
Another point is unzipping the patch that you want to apply. Here I used the same folder create before to store the patch. Everything executed in the first node and as the user for GI:
[grid@exacl04n1 +ASM1]$ cd /u01/patches/grid-19c/
[grid@exacl04n1 +ASM1]$ unzip -qa /zfs/EXADATA_PATCHING/19c/Exadata-Patch/19c-Grid/p30116789_190000_Linux-x86-64.zip
[grid@exacl04n1 +ASM1]$
[grid@exacl04n1 +ASM1]$ ls -l
total 232
drwxr-x---  7 grid oinstall   4096 Oct  9 17:11 30116789
drwxr-x--- 14 grid oinstall   4096 Jan 24 15:23 OPatch-ORG
-rw-rw-r--  1 grid oinstall 225499 Oct 15 13:24 PatchSearch.xml
[grid@exacl04n1 +ASM1]$
The version here was downloaded from node 888828.1 for Exadata and it is the GI Release Update 19.5.0.0 – Patch 30116789.
Fix know issues
Little know issues need to be fixed before you upgrade the GI. These errors were based on my experience during passed upgraded (These errors were not reported by cluster verify utility).
Lock for oraInventory
The first is related to inventory lock files. It is common to have an environment with role separation (where GI runs with a different user than OH) and can occur that lock file can be set as other ownership. To fix execute in both nodes (or dcli for Exadata):
[root@exacl04n1 ~]# dcli -g /zfs/EXADATA/exacl04.txt -l root "chown grid:oinstall /u01/app/oraInventory/locks -R"
[root@exacl04n1 ~]#
[root@exacl04n1 ~]# dcli -g /zfs/EXADATA/exacl04.txt -l root "ls -l /u01/app/oraInventory/locks"
exacl04n1: total 0
exacl04n1: -rw-r--r-- 1 grid oinstall 0 Jan 20 13:07 inventory.lock
exacl04n2: total 0
exacl04n2: -rw-r--r-- 1 grid oinstall 0 Jan 21 13:36 inventory.lock
[root@exacl04n1 ~]#
ACFS for ghchkpt
Can occur that GHCHKPT filesystem was removed (intentionally or no) from the current GI home and during the rootupgrade.sh you can hit the error belowing it does not exists:
2019/12/04 17:09:28 CLSRSC-692: Checking whether CRS entities are ready for upgrade. This operation may take a few minutes.
PRCR-1129 : Failed to upgrade resource type ora.rhpserver.type
PRCR-1071 : Failed to register or update resource ora.rhpserver
CRS-2510: Resource 'ora.datac3.ghchkpt.acfs' used in dependency 'hard' does not exist or is not registered.
CRS-2514: Dependency attribute specification 'hard' is invalid in resource 'ora.rhpserver'
2019/12/04 17:11:14 CLSRSC-180: An error occurred while executing the command '/u01/app/19.0.0.0/grid/bin/srvctl upgrade model  -s 18.0.0.0.0 -d 19.0.0.0.0 -p first'
2019/12/04 17:11:17 CLSRSC-694: failed to validate CRS entities for upgrade, aborting the upgrade
2019/12/04 17:11:17 CLSRSC-362: The pre-upgrade checks failed, aborting the upgrade
Died at /u01/app/19.0.0.0/grid/crs/install/crsupgrade.pm line 3772.
[root@exacl03n1 ~]#
To avoid this you need to recreate it manually doing this:
[root@exacl04n1 ~]# su - grid
Last login: Fri Jan 24 14:51:16 CET 2020 from 35.213.248.138 on ssh
[grid@exacl04n1 +ASM1]$
[grid@exacl04n1 +ASM1]$ #CHECK if ghchkpt exists. In this case NO
[grid@exacl04n1 +ASM1]$
[grid@exacl04n1 +ASM1]$ crsctl stat res -w "TYPE = ora.acfs.type" -p | grep VOLUME
AUX_VOLUMES=
CANONICAL_VOLUME_DEVICE=/dev/asm/acfsoh-256
VOLUME_DEVICE=/dev/asm/acfsoh-256
AUX_VOLUMES=
CANONICAL_VOLUME_DEVICE=/dev/asm/acfsoh-256
VOLUME_DEVICE=/dev/asm/acfsoh-256
[grid@exacl04n1 +ASM1]$
[grid@exacl04n1 +ASM1]$
[grid@exacl04n1 +ASM1]$ #Create the volume at ASM. The size it is important
[grid@exacl04n1 +ASM1]$
[grid@exacl04n1 +ASM1]$ asmcmd
ASMCMD>
ASMCMD> volcreate -G DATAC4 -s 1536M ghchkpt
ASMCMD>
ASMCMD> volinfo -G DATAC4 ghchkpt
Diskgroup Name: DATAC4

         Volume Name: GHCHKPT
         Volume Device: /dev/asm/ghchkpt-256
         State: ENABLED
         Size (MB): 1536
         Resize Unit (MB): 512
         Redundancy: MIRROR
         Stripe Columns: 8
         Stripe Width (K): 1024
         Usage:
         Mountpath:

ASMCMD>
ASMCMD> exit
[grid@exacl04n1 +ASM1]$
[grid@exacl04n1 +ASM1]$ #Format the volume as ACFS
[grid@exacl04n1 +ASM1]$
[grid@exacl04n1 +ASM1]$ /sbin/mkfs -t acfs /dev/asm/ghchkpt-256
mkfs.acfs: version                   = 18.0.0.0.0
mkfs.acfs: on-disk version           = 46.0
mkfs.acfs: volume                    = /dev/asm/ghchkpt-256
mkfs.acfs: volume size               = 1610612736  (   1.50 GB )
mkfs.acfs: Format complete.
[grid@exacl04n1 +ASM1]$
[grid@exacl04n1 +ASM1]$
[grid@exacl04n1 +ASM1]$ logout

[root@exacl04n1 ~]#
[root@exacl04n1 ~]# #As root, add the filesystem at current GI
[root@exacl04n1 ~]#
[root@exacl04n1 ~]# export ORACLE_HOME=/u01/app/18.0.0/grid
[root@exacl04n1 ~]# $ORACLE_HOME/bin/srvctl add filesystem -d /dev/asm/ghchkpt-256 -g DATAC4 -v GHCHKPT -m /mnt/oracle/rhpimages/chkbase/ -user oracle,grid
[root@exacl04n1 ~]#
[root@exacl04n1 ~]#
[root@exacl04n1 ~]# #Check that everything is OK
[root@exacl04n1 ~]#
[root@exacl04n1 ~]# $ORACLE_HOME/bin/crsctl stat res -t |grep acfs
ora.datac4.acfsoh.acfs
               ONLINE  ONLINE       exacl04n1                mounted on /u01/acfs
               ONLINE  ONLINE       exacl04n2                mounted on /u01/acfs
ora.datac4.ghchkpt.acfs
[root@exacl04n1 ~]#
[root@exacl04n1 ~]#
[root@exacl04n1 ~]# $ORACLE_HOME/bin/crsctl stat res -w "TYPE = ora.acfs.type" -p | grep VOLUME
AUX_VOLUMES=
CANONICAL_VOLUME_DEVICE=/dev/asm/acfsoh-256
VOLUME_DEVICE=/dev/asm/acfsoh-256
AUX_VOLUMES=
CANONICAL_VOLUME_DEVICE=/dev/asm/acfsoh-256
VOLUME_DEVICE=/dev/asm/acfsoh-256
AUX_VOLUMES=
CANONICAL_VOLUME_DEVICE=/dev/asm/ghchkpt-256
VOLUME_DEVICE=/dev/asm/ghchkpt-256
AUX_VOLUMES=
CANONICAL_VOLUME_DEVICE=/dev/asm/ghchkpt-256
VOLUME_DEVICE=/dev/asm/ghchkpt-256
[root@exacl04n1 ~]#
[root@exacl04n1 ~]#
Important here is the size for GHCHKPT volume that needs to be 1536M and registered at current GI. When registered the filesystem remember to set correctly the volume name.
ACFS filesystem and CRS resources
If you have some mountpoint over ACFS, it is recommended to stop it “safely” before executing the gridSetup. This occurs because during the upgrade phase the script will try to shutdown the entire clusters in the node, and if the unmount of ACFS goes wrong you will receive an error (and this can be boring and stressful to handle). The same is valid for resources that you registered at CRS.
So, just verify ACFS and unmount it (including stop the ACFS filesystem) and stop additional CRS resources:
[root@exacl04n1 ~]# /u01/app/18.0.0/grid/bin/crsctl stop res flk.mountbind -n exacl04n1
CRS-2673: Attempting to stop 'flk.mountbind' on 'exacl04n1'
CRS-2675: Stop of 'flk.mountbind' on 'exacl04n1' failed
CRS-2679: Attempting to clean 'flk.mountbind' on 'exacl04n1'
CRS-2681: Clean of 'flk.mountbind' on 'exacl04n1' succeeded
[root@exacl04n1 ~]#
[root@exacl04n1 ~]# #Stopped two times (the error above was expected)
[root@exacl04n1 ~]#
[root@exacl04n1 ~]# /u01/app/18.0.0/grid/bin/crsctl stop res flk.mountbind -n exacl04n1
CRS-2500: Cannot stop resource 'flk.mountbind' as it is not running
CRS-4000: Command Stop failed, or completed with errors.
[root@exacl04n1 ~]#
[root@exacl04n1 ~]# #Stop ACFS
[root@exacl04n1 ~]#
[root@exacl04n1 ~]# /u01/app/18.0.0/grid/bin/srvctl stop filesystem -d /dev/asm/acfsoh-256 -n exacl04n1
[root@exacl04n1 ~]#
Run gridSetup.sh
After preparing everything, patches, folders, and fix some issues we can call the gridSetup.sh to install the Oracle GI 19c.
The first is clear all the current session variables that point to the current GI, and set some variables (as DISPLAY for X and move to the new GI home to call the grid setup):
[root@exacl04n1 ~]# su - grid
.Last login: Fri Jan 24 16:06:12 CET 2020 from 35.213.248.138 on ssh
[grid@exacl04n1 +ASM1]$
[grid@exacl04n1 +ASM1]$ unset ORACLE_HOME
[grid@exacl04n1 +ASM1]$ unset ORACLE_BASE
[grid@exacl04n1 +ASM1]$ unset ORACLE_SID
[grid@exacl04n1 ]$
[grid@exacl04n1 ]$ cd /u01/app/19.0.0.0/grid/
[grid@exacl04n1 ]$
[grid@exacl04n1 ]$ export DISPLAY=35.213.248.116:1.0
[grid@exacl04n1 ]$
Now the gridSetup.sh can be called, and I do this with some special parameters:
- -applyRU: This will apply the Release Update passed as parameter BEFORE start to install the 19c GI.
- mgmtDB parameters: With 19c the MGMTDB it is not needed anymore, these parameters disable the installation and even the options are not shown during the graphical installation.
So, the call it is:
[grid@exacl04n1 ]$ ./gridSetup.sh -applyRU /u01/patches/grid-19c/30116789 -J-Doracle.install.mgmtDB=false -J-Doracle.install.mgmtDB.CDB=false -J Doracle.install.crs.enableRemoteGIMR=false
Preparing the home to patch...
Applying the patch /u01/patches/grid-19c/30116789...
Successfully applied the patch.
The log can be found at: /u01/app/oraInventory/logs/GridSetupActions2020-01-17_04-49-57PM/installerPatchActions_2020-01-17_04-49-57PM.log
Launching Oracle Grid Infrastructure Setup Wizard...

The response file for this session can be found at:
 /u01/app/19.0.0.0/grid/install/response/grid_2020-01-17_04-49-57PM.rsp
...
As you saw, the report says that the patch 30116789 was installed over the GI home (this took around 10 minutes). Just after that the graphical installer appears and the installation is basically NNF (next next finish) until the request for root upgrade scripts appears:


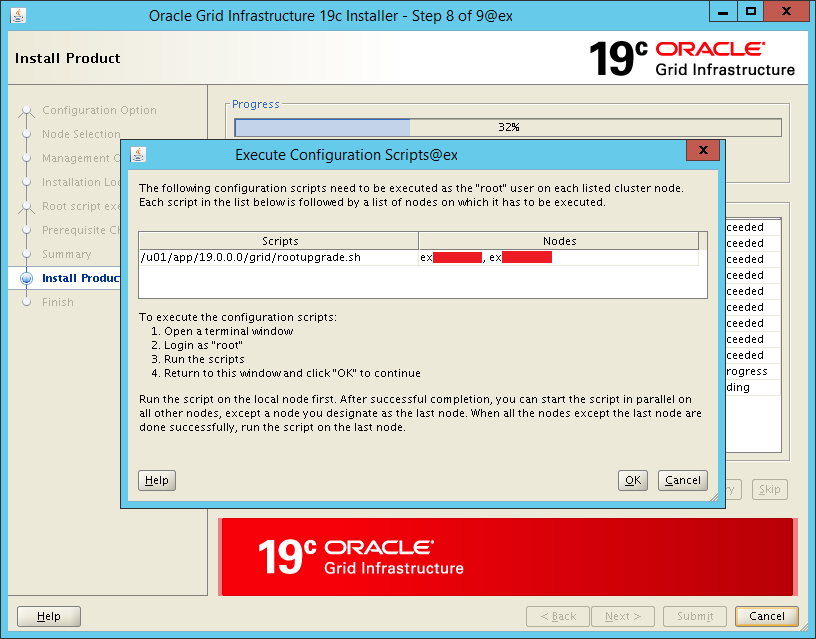
rootupgrade.sh – Node 1
At this point it is needed to execute, node by node, the rootupgrade.sh to “finish” the installation. The rootupgrade.sh execute important steps like:
- TFA upgrade
- Upgrade OCR
- Upgrade ACFS driver
- Upgrade GI scripts
If something wrong occurs here (mainly after step 3) the recommendation is open SR to verify the errors and if the issue.
Another point is stop all Oracle Databases running in the node before executing the script.
So, in the first node was called the rootupgrade.sh:
[root@exacl04n1 ~]# /u01/app/19.0.0.0/grid/rootupgrade.sh
Performing root user operation.

The following environment variables are set as:
    ORACLE_OWNER= grid
    ORACLE_HOME=  /u01/app/19.0.0.0/grid

Enter the full pathname of the local bin directory: [/usr/local/bin]:
The contents of "dbhome" have not changed. No need to overwrite.
The file "oraenv" already exists in /usr/local/bin.  Overwrite it? (y/n)
[n]: y
   Copying oraenv to /usr/local/bin ...
The file "coraenv" already exists in /usr/local/bin.  Overwrite it? (y/n)
[n]: y
   Copying coraenv to /usr/local/bin ...

Entries will be added to the /etc/oratab file as needed by
Database Configuration Assistant when a database is created
Finished running generic part of root script.
Now product-specific root actions will be performed.
Relinking oracle with rac_on option
Using configuration parameter file: /u01/app/19.0.0.0/grid/crs/install/crsconfig_params
The log of current session can be found at:
  /u01/app/grid/crsdata/exacl04n1/crsconfig/rootcrs_exacl04n1_2020-01-24_04-42-49PM.log
2020/01/24 16:43:14 CLSRSC-595: Executing upgrade step 1 of 18: 'UpgradeTFA'.
2020/01/24 16:43:14 CLSRSC-4015: Performing install or upgrade action for Oracle Trace File Analyzer (TFA) Collector.
2020/01/24 16:43:14 CLSRSC-595: Executing upgrade step 2 of 18: 'ValidateEnv'.
2020/01/24 16:43:19 CLSRSC-595: Executing upgrade step 3 of 18: 'GetOldConfig'.
2020/01/24 16:43:19 CLSRSC-464: Starting retrieval of the cluster configuration data
2020/01/24 16:47:50 CLSRSC-692: Checking whether CRS entities are ready for upgrade. This operation may take a few minutes.
2020/01/24 16:48:25 CLSRSC-4003: Successfully patched Oracle Trace File Analyzer (TFA) Collector.
2020/01/24 16:50:06 CLSRSC-693: CRS entities validation completed successfully.
2020/01/24 16:50:12 CLSRSC-515: Starting OCR manual backup.
2020/01/24 16:50:48 CLSRSC-516: OCR manual backup successful.
2020/01/24 16:50:57 CLSRSC-486:
 At this stage of upgrade, the OCR has changed.
 Any attempt to downgrade the cluster after this point will require a complete cluster outage to restore the OCR.
2020/01/24 16:50:57 CLSRSC-541:
 To downgrade the cluster:
 1. All nodes that have been upgraded must be downgraded.
2020/01/24 16:50:57 CLSRSC-542:
 2. Before downgrading the last node, the Grid Infrastructure stack on all other cluster nodes must be down.
2020/01/24 16:51:07 CLSRSC-465: Retrieval of the cluster configuration data has successfully completed.
2020/01/24 16:51:07 CLSRSC-595: Executing upgrade step 4 of 18: 'GenSiteGUIDs'.
2020/01/24 16:51:08 CLSRSC-595: Executing upgrade step 5 of 18: 'UpgPrechecks'.
2020/01/24 16:51:13 CLSRSC-363: User ignored prerequisites during installation
2020/01/24 16:51:25 CLSRSC-595: Executing upgrade step 6 of 18: 'SetupOSD'.
2020/01/24 16:51:25 CLSRSC-595: Executing upgrade step 7 of 18: 'PreUpgrade'.
2020/01/24 16:55:02 CLSRSC-468: Setting Oracle Clusterware and ASM to rolling migration mode
2020/01/24 16:55:02 CLSRSC-482: Running command: '/u01/app/18.0.0/grid/bin/crsctl start rollingupgrade 19.0.0.0.0'
CRS-1131: The cluster was successfully set to rolling upgrade mode.
2020/01/24 16:55:09 CLSRSC-482: Running command: '/u01/app/19.0.0.0/grid/bin/asmca -silent -upgradeNodeASM -nonRolling false -oldCRSHome /u01/app/18.0.0/grid -oldCRSVersion 18.0.0.0.0 -firstNode true -startRolling false '

ASM configuration upgraded in local node successfully.

2020/01/24 16:55:12 CLSRSC-469: Successfully set Oracle Clusterware and ASM to rolling migration mode
2020/01/24 16:55:18 CLSRSC-466: Starting shutdown of the current Oracle Grid Infrastructure stack
2020/01/24 16:56:08 CLSRSC-467: Shutdown of the current Oracle Grid Infrastructure stack has successfully completed.
2020/01/24 16:56:11 CLSRSC-595: Executing upgrade step 8 of 18: 'CheckCRSConfig'.
2020/01/24 16:56:12 CLSRSC-595: Executing upgrade step 9 of 18: 'UpgradeOLR'.
2020/01/24 16:56:23 CLSRSC-595: Executing upgrade step 10 of 18: 'ConfigCHMOS'.
2020/01/24 16:56:23 CLSRSC-595: Executing upgrade step 11 of 18: 'UpgradeAFD'.
2020/01/24 16:56:30 CLSRSC-595: Executing upgrade step 12 of 18: 'createOHASD'.
2020/01/24 16:56:37 CLSRSC-595: Executing upgrade step 13 of 18: 'ConfigOHASD'.
2020/01/24 16:56:37 CLSRSC-329: Replacing Clusterware entries in file 'oracle-ohasd.service'
2020/01/24 16:57:29 CLSRSC-595: Executing upgrade step 14 of 18: 'InstallACFS'.
2020/01/24 16:58:01 CLSRSC-595: Executing upgrade step 15 of 18: 'InstallKA'.
2020/01/24 16:58:21 CLSRSC-595: Executing upgrade step 16 of 18: 'UpgradeCluster'.
2020/01/24 17:00:27 CLSRSC-343: Successfully started Oracle Clusterware stack
clscfg: EXISTING configuration version 5 detected.
Successfully taken the backup of node specific configuration in OCR.
Successfully accumulated necessary OCR keys.
Creating OCR keys for user 'root', privgrp 'root'..
Operation successful.
2020/01/24 17:00:52 CLSRSC-595: Executing upgrade step 17 of 18: 'UpgradeNode'.
2020/01/24 17:00:57 CLSRSC-474: Initiating upgrade of resource types
2020/01/24 17:02:09 CLSRSC-475: Upgrade of resource types successfully initiated.
2020/01/24 17:02:24 CLSRSC-595: Executing upgrade step 18 of 18: 'PostUpgrade'.
2020/01/24 17:02:34 CLSRSC-325: Configure Oracle Grid Infrastructure for a Cluster ... succeeded
[root@exacl04n1 ~]#
After finish with success, you can start the Oracle Databases in this node, or even relocate RACOneNode databases to this node.
rootupgrade.sh – Node 2
Here it is called the script in the second node. But some details before execute it:
- Stop and unmount ACFS filesystem running in the node
- Stop any additional resources at CRS running in this node
- Stop all Databases running in the node (you relocate to others nodes already upgraded)
After checking the points above, you can call the script:
[root@exacl04n2 ~]# /u01/app/18.0.0/grid/bin/crsctl stop res flk.mountbind -n exacl04n2
CRS-2673: Attempting to stop 'flk.mountbind' on 'exacl04n2'
CRS-2675: Stop of 'flk.mountbind' on 'exacl04n2' failed
CRS-2679: Attempting to clean 'flk.mountbind' on 'exacl04n2'
CRS-2681: Clean of 'flk.mountbind' on 'exacl04n2' succeeded
[root@exacl04n2 ~]#
[root@exacl04n2 ~]#
[root@exacl04n2 ~]# /u01/app/18.0.0/grid/bin/crsctl stop res flk.mountbind -n exacl04n2
CRS-2500: Cannot stop resource 'flk.mountbind' as it is not running
CRS-4000: Command Stop failed, or completed with errors.
[root@exacl04n2 ~]#
[root@exacl04n2 ~]#
[root@exacl04n2 ~]# /u01/app/18.0.0/grid/bin/srvctl stop filesystem -d /dev/asm/acfsoh-256 -n exacl04n2
[root@exacl04n2 ~]#
[root@exacl04n2 ~]#
[root@exacl04n2 ~]# /u01/app/19.0.0.0/grid/rootupgrade.sh
Performing root user operation.

The following environment variables are set as:
    ORACLE_OWNER= grid
    ORACLE_HOME=  /u01/app/19.0.0.0/grid

Enter the full pathname of the local bin directory: [/usr/local/bin]:
The contents of "dbhome" have not changed. No need to overwrite.
The file "oraenv" already exists in /usr/local/bin.  Overwrite it? (y/n)
[n]: y
   Copying oraenv to /usr/local/bin ...
The file "coraenv" already exists in /usr/local/bin.  Overwrite it? (y/n)
[n]: y
   Copying coraenv to /usr/local/bin ...

Entries will be added to the /etc/oratab file as needed by
Database Configuration Assistant when a database is created
Finished running generic part of root script.
Now product-specific root actions will be performed.
Relinking oracle with rac_on option
Using configuration parameter file: /u01/app/19.0.0.0/grid/crs/install/crsconfig_params
The log of current session can be found at:
  /u01/app/grid/crsdata/exacl04n2/crsconfig/rootcrs_exacl04n2_2020-01-24_06-01-55PM.log
2020/01/24 18:02:12 CLSRSC-595: Executing upgrade step 1 of 18: 'UpgradeTFA'.
2020/01/24 18:02:12 CLSRSC-4015: Performing install or upgrade action for Oracle Trace File Analyzer (TFA) Collector.
2020/01/24 18:02:12 CLSRSC-595: Executing upgrade step 2 of 18: 'ValidateEnv'.
2020/01/24 18:02:13 CLSRSC-595: Executing upgrade step 3 of 18: 'GetOldConfig'.
2020/01/24 18:02:13 CLSRSC-464: Starting retrieval of the cluster configuration data
2020/01/24 18:02:42 CLSRSC-465: Retrieval of the cluster configuration data has successfully completed.
2020/01/24 18:02:42 CLSRSC-595: Executing upgrade step 4 of 18: 'GenSiteGUIDs'.
2020/01/24 18:02:43 CLSRSC-595: Executing upgrade step 5 of 18: 'UpgPrechecks'.
2020/01/24 18:02:43 CLSRSC-363: User ignored prerequisites during installation
2020/01/24 18:02:44 CLSRSC-595: Executing upgrade step 6 of 18: 'SetupOSD'.
2020/01/24 18:02:44 CLSRSC-595: Executing upgrade step 7 of 18: 'PreUpgrade'.

ASM configuration upgraded in local node successfully.

2020/01/24 18:03:01 CLSRSC-466: Starting shutdown of the current Oracle Grid Infrastructure stack
2020/01/24 18:04:45 CLSRSC-467: Shutdown of the current Oracle Grid Infrastructure stack has successfully completed.
2020/01/24 18:04:57 CLSRSC-595: Executing upgrade step 8 of 18: 'CheckCRSConfig'.
2020/01/24 18:04:57 CLSRSC-595: Executing upgrade step 9 of 18: 'UpgradeOLR'.
2020/01/24 18:05:05 CLSRSC-595: Executing upgrade step 10 of 18: 'ConfigCHMOS'.
2020/01/24 18:05:06 CLSRSC-595: Executing upgrade step 11 of 18: 'UpgradeAFD'.
2020/01/24 18:05:07 CLSRSC-595: Executing upgrade step 12 of 18: 'createOHASD'.
2020/01/24 18:05:09 CLSRSC-595: Executing upgrade step 13 of 18: 'ConfigOHASD'.
2020/01/24 18:05:09 CLSRSC-329: Replacing Clusterware entries in file 'oracle-ohasd.service'
2020/01/24 18:05:54 CLSRSC-595: Executing upgrade step 14 of 18: 'InstallACFS'.
2020/01/24 18:06:18 CLSRSC-4003: Successfully patched Oracle Trace File Analyzer (TFA) Collector.
2020/01/24 18:06:20 CLSRSC-595: Executing upgrade step 15 of 18: 'InstallKA'.
2020/01/24 18:06:34 CLSRSC-595: Executing upgrade step 16 of 18: 'UpgradeCluster'.
2020/01/24 18:08:31 CLSRSC-343: Successfully started Oracle Clusterware stack
clscfg: EXISTING configuration version 19 detected.
Successfully taken the backup of node specific configuration in OCR.
Successfully accumulated necessary OCR keys.
Creating OCR keys for user 'root', privgrp 'root'..
Operation successful.
2020/01/24 18:08:46 CLSRSC-595: Executing upgrade step 17 of 18: 'UpgradeNode'.
Start upgrade invoked..
2020/01/24 18:08:50 CLSRSC-478: Setting Oracle Clusterware active version on the last node to be upgraded
2020/01/24 18:08:50 CLSRSC-482: Running command: '/u01/app/19.0.0.0/grid/bin/crsctl set crs activeversion'
Started to upgrade the active version of Oracle Clusterware. This operation may take a few minutes.
Started to upgrade CSS.
CSS was successfully upgraded.
Started to upgrade Oracle ASM.
Started to upgrade CRS.
CRS was successfully upgraded.
Started to upgrade Oracle ACFS.
Oracle ACFS was successfully upgraded.
Successfully upgraded the active version of Oracle Clusterware.
Oracle Clusterware active version was successfully set to 19.0.0.0.0.
2020/01/24 18:10:02 CLSRSC-479: Successfully set Oracle Clusterware active version
2020/01/24 18:10:04 CLSRSC-476: Finishing upgrade of resource types
2020/01/24 18:10:18 CLSRSC-477: Successfully completed upgrade of resource types
2020/01/24 18:10:45 CLSRSC-595: Executing upgrade step 18 of 18: 'PostUpgrade'.
Successfully updated XAG resources.
2020/01/24 18:11:21 CLSRSC-325: Configure Oracle Grid Infrastructure for a Cluster ... succeeded
[root@exacl04n2 ~]#
[root@exacl04n2 ~]#
As you can see, everything was fine and the cluster was upgraded in both nodes. If you have more nodes, continue with the others.
Continue with Graphical Installation – AND INTENTIONAL ERROR
After that is possible to continue the installation at the graphical side. But we will hit on intentional error.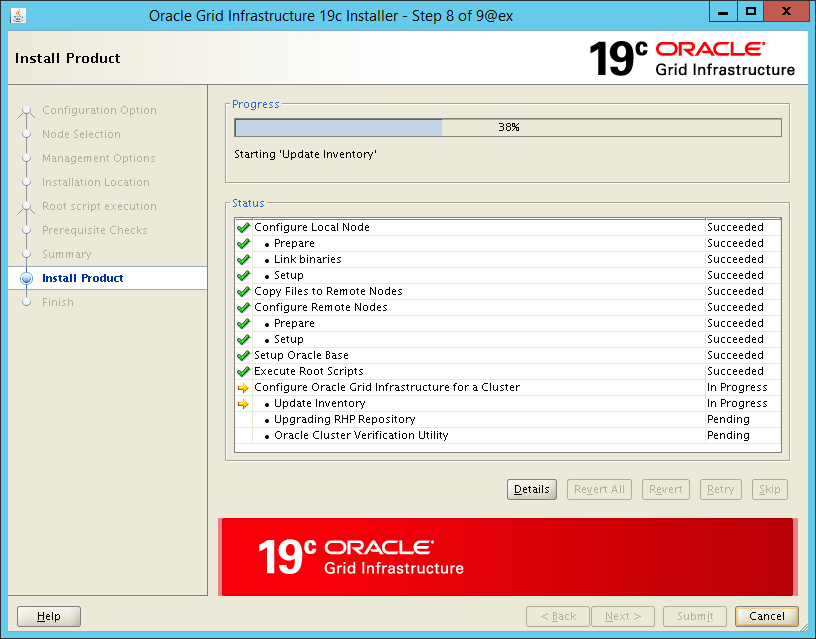
During the phase Upgrade RHP Repository will occur one error. But this is expected. Remember that during the gridSetup.sh the mgmtDB parameters were disabled? So, since it was not created, the RHP will fail because the mgmtDB was not found (this occurred in all of 10 clusters that upgraded recently):
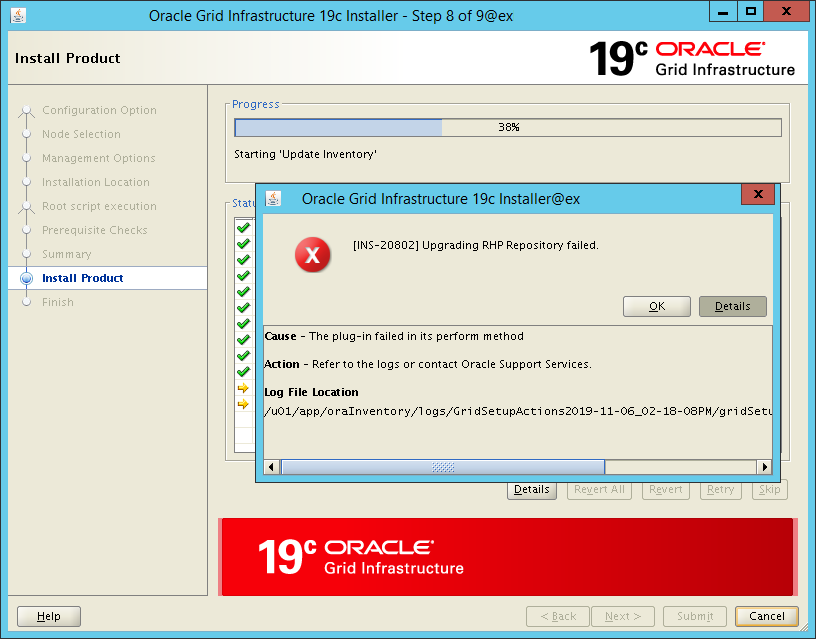
If you check in the log you will see details informing that mgmtDB was not found. To solve, just click OK and Skip. Look below that upgrade RHP was Ignored.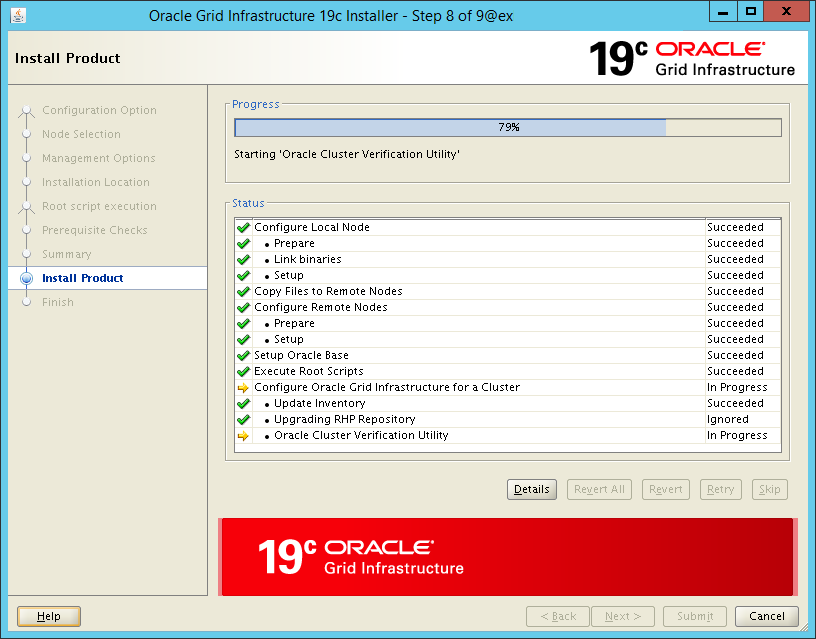
Post Upgrade
After finish the upgrade above, everything will be working correctly. But some details need to be checked to deliver everything at 100%.
ASM Compatibility
Remember that now the ASM.COMPATIBILITY parameter can be upgraded to allow you to use some new features. Remember, just ASM.COMPATIBILITY for all diskgroups:
[grid@exacl04n1 +ASM1]$ echo "ALTER DISKGROUP DATAC4 SET ATTRIBUTE 'compatible.asm' = '19.3.0.0.0';" | sqlplus -s / as sysasm

Diskgroup altered.

[grid@exacl04n1 +ASM1]$ echo "ALTER DISKGROUP RECOC4 SET ATTRIBUTE 'compatible.asm' = '19.3.0.0.0';" | sqlplus -s / as sysasm

Diskgroup altered.

[grid@exacl04n1 +ASM1]$
Inventory Update
Since Oracle 19C, GI did not register the nodes in the oraInventory. So, it is needed to add to allow older versions (11, 12 and 18) to see the GI nodes. Simple call resolves this (take attention the correct path and node names):
[grid@exacl04n1 +ASM1]$ /u01/app/19.0.0.0/grid/oui/bin/runInstaller -nowait -waitforcompletion -ignoreSysPrereqs -updateNodeList ORACLE_HOME=/u01/app/19.0.0.0/grid "CLUSTER_NODES={exacl04n1,exacl04n2}" CRS=true LOCAL_NODE=exacl04n1
Starting Oracle Universal Installer...

Checking swap space: must be greater than 500 MB.   Actual 16174 MB    Passed
The inventory pointer is located at /etc/oraInst.loc
[grid@exacl04n1 +ASM1]$
Remove previous GI
Remember to delete (or at least mark) in the Oracle inventory that previous GI was removed. To do that, you need to call runInstaller (from previous OH) with option detachHome. Be careful to set the ORACLE_HOME correctly (and in just one node):
[grid@exacl04n1 +ASM1]$ cat /u01/app/oraInventory/ContentsXML/inventory.xml |grep grid
<HOME NAME="OraGI18Home1" LOC="/u01/app/18.0.0/grid" TYPE="O" IDX="6">
<HOME NAME="OraGI19Home1" LOC="/u01/app/19.0.0.0/grid" TYPE="O" IDX="11" CRS="true">
<HOME NAME="OraGridHome" LOC="/u01/app/12.1.0.2/grid" TYPE="O" IDX="1" REMOVED="T"/>
<HOME NAME="OraGI12Home1" LOC="/u01/app/12.2.0.1/grid" TYPE="O" IDX="5" REMOVED="T"/>
[grid@exacl04n1 +ASM1]$
[grid@exacl04n1 +ASM1]$
[grid@exacl04n1 +ASM1]$ unset ORACLE_HOME
[grid@exacl04n1 +ASM1]$ export ORACLE_HOME=/u01/app/18.0.0/grid/
[grid@exacl04n1 +ASM1]$ $ORACLE_HOME/oui/bin/runInstaller -detachHome -silent ORACLE_HOME=/u01/app/18.0.0/grid
Starting Oracle Universal Installer...

Checking swap space: must be greater than 500 MB.   Actual 16174 MB    Passed
The inventory pointer is located at /etc/oraInst.loc
'DetachHome' was successful.
[grid@exacl04n1 +ASM1]$
[grid@exacl04n1 +ASM1]$
[grid@exacl04n1 +ASM1]$ cat /u01/app/oraInventory/ContentsXML/inventory.xml |grep grid
<HOME NAME="OraGI19Home1" LOC="/u01/app/19.0.0.0/grid" TYPE="O" IDX="11" CRS="true">
<HOME NAME="OraGridHome" LOC="/u01/app/12.1.0.2/grid" TYPE="O" IDX="1" REMOVED="T"/>
<HOME NAME="OraGI12Home1" LOC="/u01/app/12.2.0.1/grid" TYPE="O" IDX="5" REMOVED="T"/>
<HOME NAME="OraGI18Home1" LOC="/u01/app/18.0.0/grid" TYPE="O" IDX="6" REMOVED="T"/>
[grid@exacl04n1 +ASM1]$
[grid@exacl04n1 +ASM1]$
After that, you can delete the previous GI Home.
Others details
To finish, remember to fix the bash_profile and fix oratab (if you have something particularly set there). Remember to execute in both nodes:
[grid@exacl04n1 +ASM1]$
[grid@exacl04n1 +ASM1]$ cat .bash_profile |grep HOME
export ORACLE_HOME=/u01/app/18.0.0/grid
export PATH=$ORACLE_HOME/bin:/usr/local/bin:/bin:/usr/bin
[grid@exacl04n1 +ASM1]$
[grid@exacl04n1 +ASM1]$ vi .bash_profile
[grid@exacl04n1 +ASM1]$
[grid@exacl04n1 +ASM1]$ cat .bash_profile |grep HOME
export ORACLE_HOME=/u01/app/19.0.0.0/grid
export PATH=$ORACLE_HOME/bin:/usr/local/bin:/bin:/usr/bin
[grid@exacl04n1 +ASM1]$

#################
#Second node
#################

[root@exacl04n2 ~]# su - grid
Last login: Fri Jan 24 18:17:43 CET 2020 from exacl04n1.flisk.rulz.org on ssh
[grid@exacl04n2 +ASM2]$ cat .bash_profile |grep HOME
export ORACLE_HOME=/u01/app/18.0.0/grid
export PATH=$ORACLE_HOME/bin:/usr/local/bin:/bin:/usr/bin
[grid@exacl04n2 +ASM2]$
[grid@exacl04n2 +ASM2]$ vi .bash_profile
[grid@exacl04n2 +ASM2]$
[grid@exacl04n2 +ASM2]$ cat .bash_profile |grep HOME
export ORACLE_HOME=/u01/app/19.0.0.0/grid
export PATH=$ORACLE_HOME/bin:/usr/local/bin:/bin:/usr/bin
[grid@exacl04n2 +ASM2]$
Conclusion
Upgrade GI to the 19c version is easier than the previous versions. If you follow correctly the requirements probably you will not see errors. At the beginning of 2018, I made the same for 18c upgrade (migrating from 12c) and the process was similar. You can check in my post Reaching Exadata 18c.
But be careful with ACFS and the repost from cluster verify script. The output from it (even if still requires additional checks as I showed before) is a good indication of system health and “OK to continue”.
The process that I showed above was executed in Exadata, but with small adaptions (mainly for dcli), it can be used in other environments as well.
The post-upgrade has some additional tricks as I showed in the previous post about Exadata, workaround for oracka.ko error and TFA error after GI upgrade to 19c. Nothing special but will require additional attention too.
Disclaimer: “The postings on this site are my own and don’t necessarily represent my actual employer positions, strategies or opinions. The information here was edited to be useful for general purpose, specific data and identifications were removed to allow reach the generic audience and to be useful for the community. Post protected by copyright.”
Pingback: Solving MGMTDB errors during 18c GI RU apply | Fernando Simon
Nice article…
Thanks for the great article…
Pingback: 21c Grid Infrastructure Upgrade | Fernando Simon
Pingback: Exadata version 23.1.0.0.0 – Part 01 - Fernando Simon