Tag Archives: ASM

Exadata, REQUIRED_MIRROR_FREE_MB and GRID 19.19

I already wrote about the issue introduced with GI 19.16 in my previous post (click here to read) where (only at Exadata) more space was allocated/reserved by Oracle to guarantee mirror/rebalance. Fortunately, after some months of discussion, they rollbacked the change and released one patch that can be applied at GI 19.19.

The patch was released on 12 of June and it is the number 35285795 and can be only applied at GI 19.19. But to have your space back again there is one important rule: your mirroring needs to be HIGH. This is necessary because the “Smart Rebalance” that allows your disk to be dropped without losing the mirroring. I will write another post just to talk about it.

Click here to read more…

Exadata, REQUIRED_MIRROR_FREE_MB and GRID 19.16

Starting with Grid Infrastructure/ASM 19.16 Oracle changed how the REQUIRED_MIRROR_FREE_MB is calculated and the impact is more than expected. Check below examples of the changes, and how this will impact you. This is valid for all GI/ASM starting with 19.16 and only for Exadata/ExaCC.

Please read my new post about this issue.

REQUIRED_MIRROR_FREE_MB

The REQUIRED_MIRROR_FREE_MB (according to 19c documentation) is:

amount of space that must be available in a disk group to restore full redundancy after the worst failure that can be tolerated by the disk group without adding additional storage. This requirement ensures that there are sufficient failure groups to restore redundancy”.

And (at Exadata environment until 19.16) is calculated based on the disk redundancy that you have. If you choose the HIGH, the raw size of two disks (the largest in your diskgroup) is reserved; at NORMAL, is the raw size of one disk. At Exadata, it differs from other environments because does not consider the whole failgroup failure and the way that extends are written/spread (more info below and in another post).

But for now, understand that the required size is what you need to reserve (as raw space) at your diskgroup to ensure protection in case of disk failure. And it is directly related to the USABLE_FILE_MB because the space that you can allocate at your diskgroup (USABLE_FILE_MB) comes from (FREE_MB- REQUIRED_MIRROR_FREE_MB)/redundancy factor (3 for HIGH, 2 for NORMAL). So, when you increase the REQUIRED_MIRROR_FREE_MB you reduce the USABLE_FILE_MB. I will explain more later.

Click here to read more…

21c, Zero-Downtime Oracle Grid Infrastructure Patching – Silent Mode

Recently I made two posts about the process for patch/upgrading your 21 Grid Infrastructure (GI) while the databases continue to be running. The first post shows how to do this using the GUI interface, and the second one show more details about the process for AFD/ACFS Kernel Driver Update. But here in this post, I will show how to do the Zero-Downtime Patch (zeroDowntimeGIPatching – ZDGIP) in silent mode.

This way to do the patch is important because allows you to automatize it. You can create your own script and call it (using Ansible, Puppet, Chief, etc.) to upgrade your servers (or farms) remotely.

Current Environment

The current environment is the same of the first post:

  • OEL 8.4 Kernel 5.4.17-2102.201.3.el8uek.x86_64.
  • Oracle GI 21c, version 21.3 with no one-off or patches installed.
  • Oracle Database 21c, RU 21.5 (with OCW 21.5).
  • TFA version is 21.4 (last available in March 2022).
  • Nodes are not using Transparent HugePages.
  • Is a RAC installation, with two nodes.

You can see the output for the info above in this txt file.

And I will apply the same RU 21.5 (21.5.0.0.220118) for GI which is patch 33531909.

Patch Process

The patch process is almost the same as the first post, the main change is the response file and the way to call the gridSetup.sh. So, for this reason, I recommend for you read the first (and second) post. Below you will see a quick review of previous steps and a focus on the new 

Click here to read more…

21c, updateosfiles after Grid Infrastructure Patch

Recently I made one post about how to use the new feature -zeroDowntimeGIPatching when patching the Grid Infrastructure for 21c. It is a new feature/option that allows your database continues to be running while the grid is patched. You can see my post here. But during that post I talked about the usage of -updateosfiles when calling the rootcrs.sh and want to clarify some details and provide better examples.

Current environment

For this post, my environment is:

  • OEL 8.4 Kernel 5.4.17-2102.201.3.el8uek.x86_64.
  • Oracle GI 21c, version 21.5.
  • Is a RAC installation, with two nodes.

The GI was upgraded from 21.3 to 21.5 as demonstrated in my post.

Compatibility Matrix

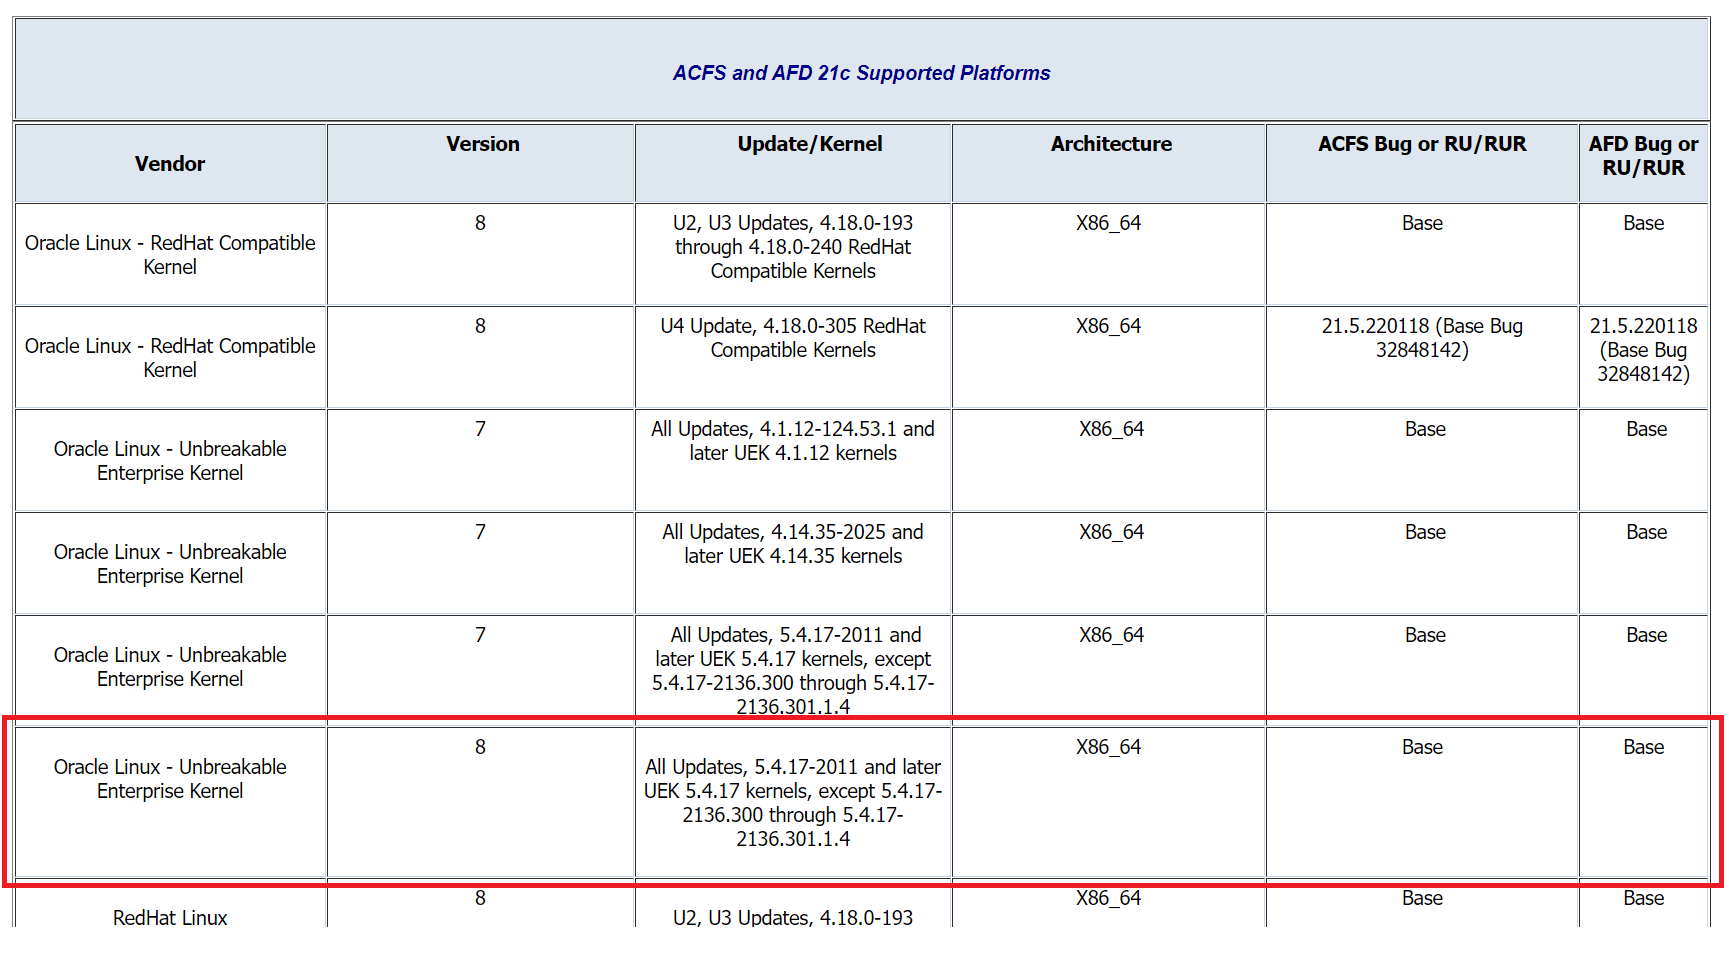
Before you think about upgrading the ACFS/AFD drivers you need to check if they are compatible with the version or kernel that you are running. The only place to check this is the MOS note ACFS Support On OS Platforms (Certification Matrix). (Doc ID 1369107.1). On that note, you will see tables for each major version (18c, 19c, 21c), and you can see the versions of Linux Version and Kernel versions that are compatible. Below is marked for OEL 8:

And you can see that my version of Linux Kernel is compatible. If your version is not compatible, not update the ACFS/AFD kernel drivers.

Click here to read more…

21c, Zero-Downtime Oracle Grid Infrastructure Patching

Oracle 21c delivered a lot of new features and for Grid infrastructure one of the most interesting is the zero-downtime patch (zeroDowntimeGIPatching). This basically allows your database continues to be running while you patch/upgrade your GI. The official doc can be seen here. Let’s say that is an evolution of the Out of Place (OOP) patch for GI.

In this post I will show how to do that, but some details before starting:

  • This post shows how to do the zero-downtime patch using GUI mode.
  • I will do another post showing how to do in silent mode the same procedure. So, it can be automatized.
  • In a third post, I will detail how the zero-downtime works behind the scenes and will discuss some logs.

Click here to read more…

ASM, REPLACE DISK Command

The REPLACE DISK command was released with 12.1 and allow to do an online replacement for a failed disk. This command is important because it reduces the rebalance time doing just the SYNC phase. Comparing with normal disk replacement (DROP and ADD in the same command), the REPLACE just do mirror resync.

Basically, when the REPLACE command is called, the rebalance just copy/sync the data from the survivor disk (the partner disk from the mirror). It is faster since the previous way with drop/add execute a complete rebalance from all AU of the diskgroup, doing REBALANCE and SYNC phase.

The replace disk command is important for the SWAP disk process for Exadata (where you add the new 14TB disks) since it is faster to do the rebalance of the diskgroup.

Click here to read more…

ASM, Mount Restricted Force For Recovery

Survive to disk failures it is crucial to avoid data corruption, but sometimes, even with redundancy at ASM, multiple failures can happen. Check in this post how to use the undocumented feature “mount restricted force for recovery” to resurrect diskgroup and lose less data when multiple failures occur.

Diskgroup redundancy is a key factor for ASM resilience, where you can survive to disk failures and still continue to run databases. I will not extend about ASM disk redundancy here, but usually, you can configure your diskgroup without redundancy (EXTERNAL), double redundancy (NORMAL), triple redundancy (HIGH), and even fourth redundancy (EXTEND for stretch clusters).

If you want to understand more about redundancy you have a lot of articles at MOS and on the internet that provide useful information. One good is this. The idea is simple, spread multiple copies in different disks. And can even be better if you group disks in the same failgroups, so, your data will have multiple copies in separate places.

As an example, this a key for Exadata, where every storage cell is one independent failgroup and you can survive to one entire cell failure (or double full, depending on the redundancy of your diskgroup) without data loss. The same idea can be applied at a “normal” environment, where you can create failgroup to disks attached to controller A, and another attached to controller B (so the failure of one storage controller does not affect all failgroups). At ASM, if you do not create failgroup, each disk is a different one in diskgroups that have redundancy enabled.

Click here to read more…
Shrink ASM Diskgroup and Exadata Grid Disks

Here I will cover the shrink of ASM diskgroup in Exadata environment running VM’s. The process here is the opposite of what I wrote in the previous post, but have a tricky part that demands attention to avoid errors. The same points that you checked for extending are valid now: number the cells, disks per cell, ASM mirroring, and the VM that you want to change continue to be important, but we have more now. Besides that, the post shows how to verify (and “fix”) if you have something in the ASM internal extent map that can block the shrink.

More…

Increase size for Exadata Grid Disks

A quick article about a maintenance task for Oracle Exadata when you are using OVM and you divided your storage cell disks for every VM. Here I will show you how to extend your Grid Disks to add more space in your ASM diskgroup.

The first thing is being aware of your environment, before everything you need to know the points below because, they are important to calculate the new space, and to avoid do something wrong:

  • Number of cells in your appliance.
  • Number of disks for each cell.
  • Mirroring for your ASM.
  • The VM that you want to add the space.

The “normal” Exadata storage cell has 12 disks, the Extreme Flash version uses 8 disks per storage. If you have doubt about how many disks you have per storage cell, you can connect in each one and check the number of celldisks you have. And before continuing, be aware of Exadata disk division:

To do this change we execute three major steps: ASM, Exadata Storage, and ASM again.

More…

ODA, ACFS and ASM Dilemma

As you know, for ODA, you have two options for storage: ACFS or ASM. If you choose ACFS, you can create all versions for databases, from 11g to 18c (until this moment). But if you choose ASM, the 11g will not be compatible.

So, ASM or ACFS? If you choose ACFS, the diskgroup where ACFS runs will be sliced and you have one mount point for each database. If you have, as an example, one system with more than 30 databases, can be complicated to manage all the ACFS mount points. So, ASM it simple and easier solution to sustain. Besides the fact that it is more homogeneous with other database environments (Exadata, RAC’s …etc).

If you choose ASM you can’t use 11g versions or avoid the ACFS mount points for all databases, but you can do a little simple approach to use 11g databases and still use ASM for others. Took one example where just 3 or 4 databases will run over 11g version and all others 30 databases in the environment will be in 12/18. To achieve that, the option, in this case, is using a “manual” ACFS mount point, I will explain.

More…